Terragrunt Scale
Terragrunt Scale is Gruntwork’s solution for running Terragrunt at scale. You can learn more about it here.
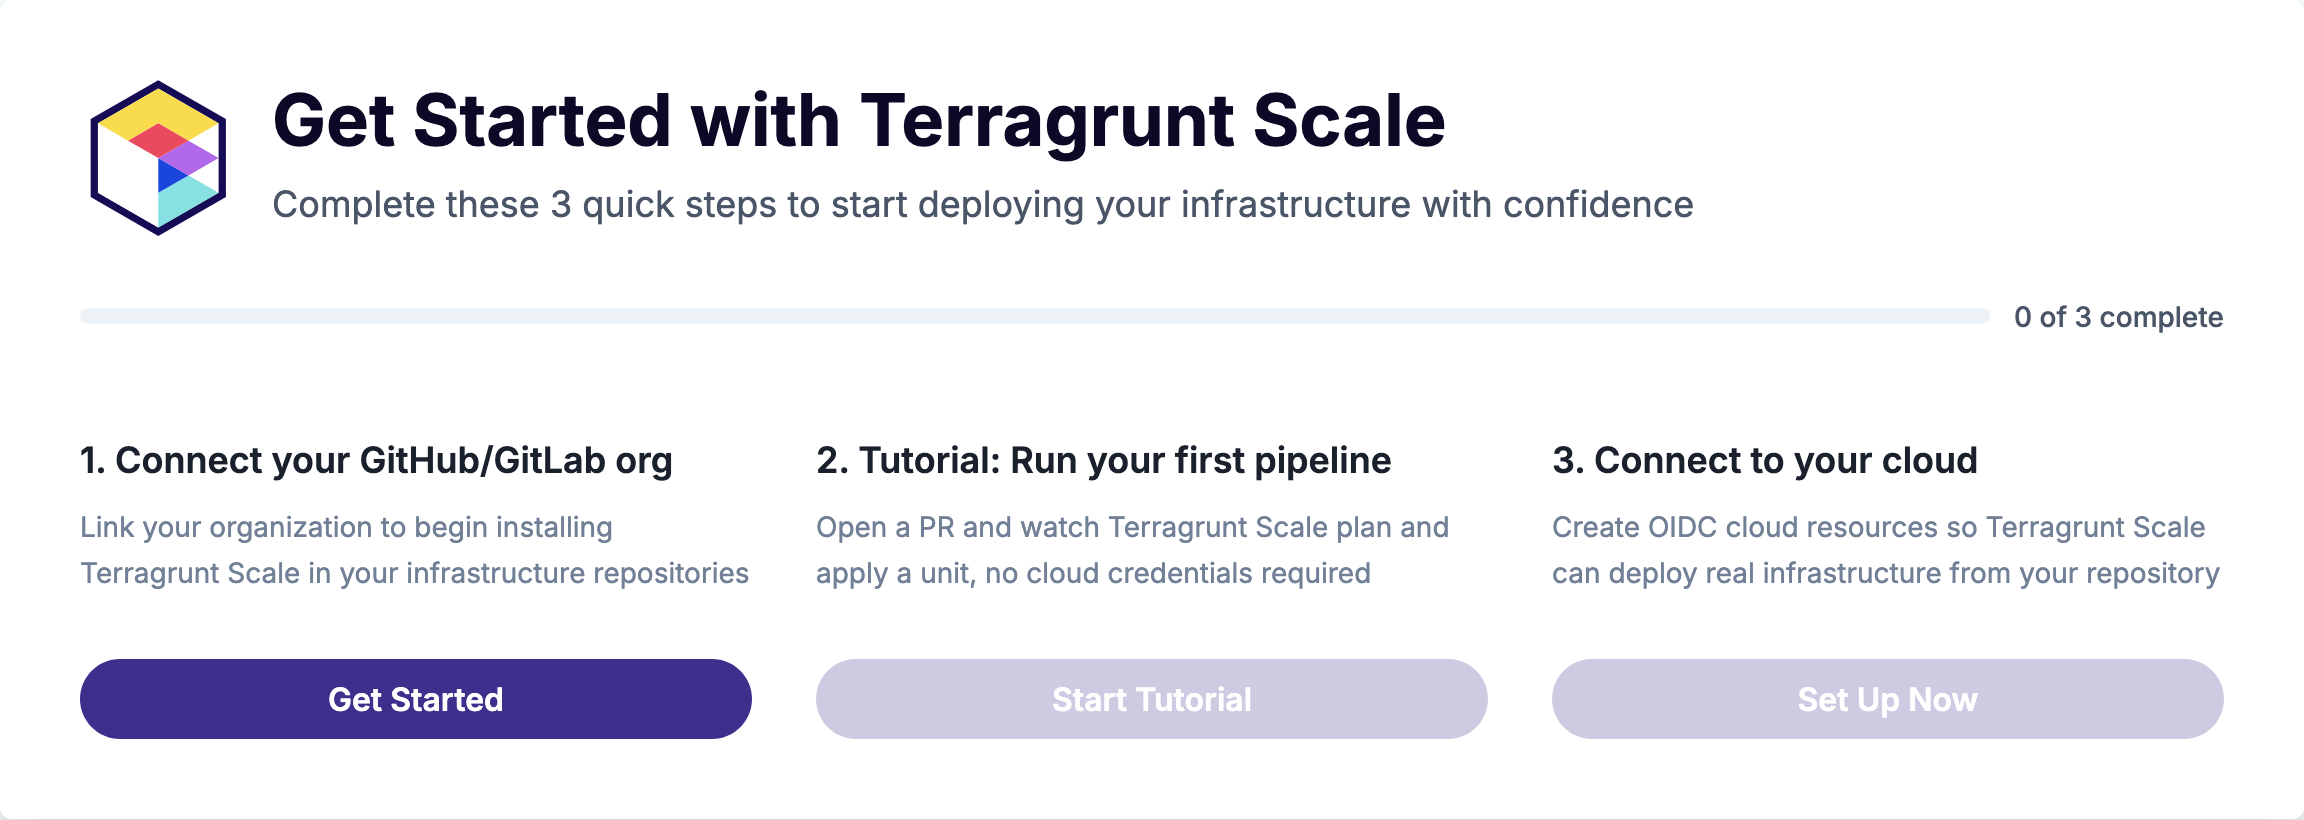
Onboarding is organized into three short wizards:
- Connect your source control manager, which installs the Gruntwork GitHub App and picks the repository to set up.
- Run your first pipeline, which installs Pipelines in your repository and walks you through a full plan/apply/destroy cycle without using any cloud credentials.
- Connect your cloud, which provisions OIDC authentication and the IAM roles Pipelines uses to deploy real infrastructure.
The ordering is deliberate. You get a working pipeline that plans on every PR and applies on merge before you connect AWS, so you can see the GitOps workflow end to end before any real infrastructure or credentials are involved.
By the end of this section, you’ll have a GitHub repository with Terragrunt infrastructure code, GitHub Actions workflows for plan-on-PR and apply-on-merge automation, OIDC authentication to your AWS account, and a pipeline ready to deploy real infrastructure.
Sign up for Terragrunt Scale Free Tier
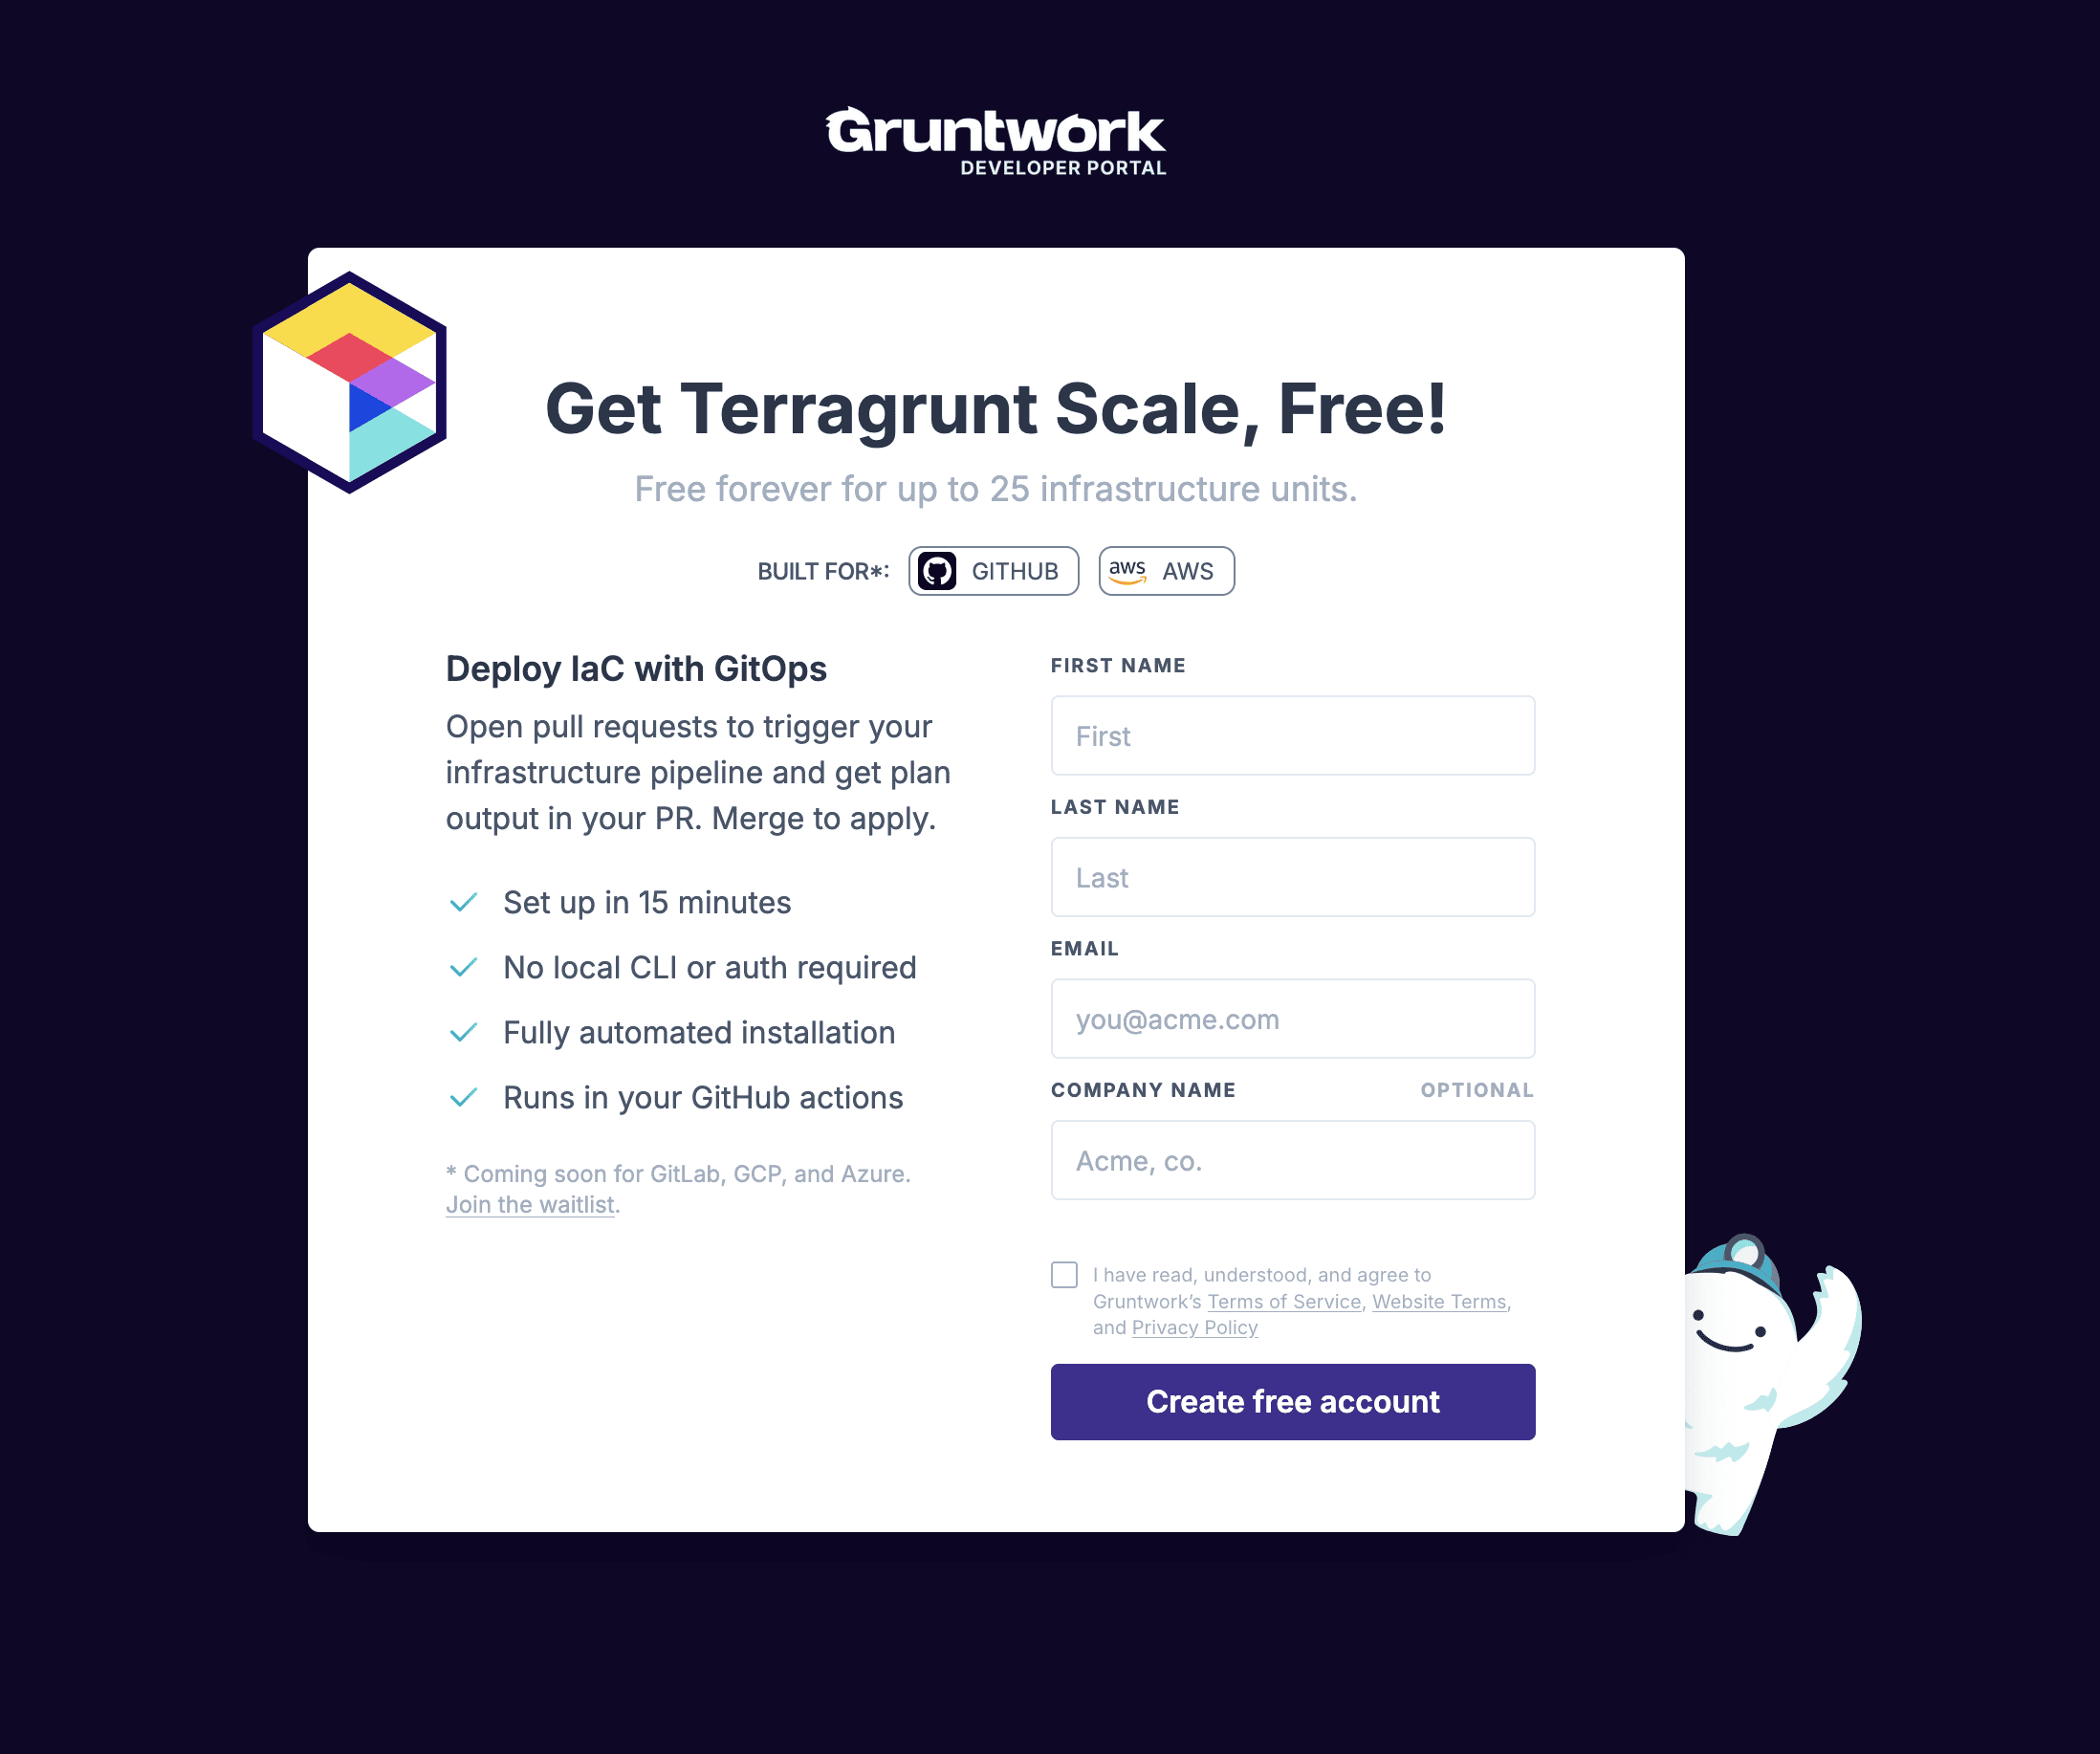
Section titled “Sign up for Terragrunt Scale Free Tier”Head to the Terragrunt Scale Free Tier signup to create an account. The free tier supports up to 25 units with a convenient onboarding wizard for GitHub and AWS. No credit card is required for signup.
After signing up, the home screen presents the three setup steps. The first step unlocks the other two, and you can step away and pick back up where you left off at any point.
The walkthrough below captures the experience so you can see what each wizard does before you commit to running it yourself. Expand it when you’re ready to follow along.
Walkthrough screenshots
Connect your source control manager
Section titled “Connect your source control manager”Right now, the only Source Control Manager (SCM) the onboarding wizard supports is GitHub. Pipelines also works with GitLab, but the wizard doesn’t support GitLab yet.

The wizard prompts you to install the Gruntwork.io GitHub App on your GitHub account or organization. This app is what allows Terragrunt Scale to open pull requests and post plan results as comments on them, and to check out the Git repositories you give it access to. It acquires this access from within your GitHub Actions workflows, and it does not access your cloud infrastructure or your OpenTofu state.
When prompted, choose “Only select repositories” and select the repository you want to set up.
After the app is installed and verified, the wizard asks you to choose the repository to configure. You can select an existing infrastructure repository or create a new empty one and select it here.
A fresh, empty repository works best. If you point the wizard at an existing repository, the pull requests it opens can conflict with files already in place.
Run your first pipeline
Section titled “Run your first pipeline”This wizard installs Pipelines in your repository and teaches the GitOps workflow without using any cloud credentials. It does this with a placeholder unit that creates a null_resource, which exercises the full plan/apply cycle without provisioning anything in AWS.
You’ll work through three pull requests:
- Add a unit. The first pull request installs Pipelines in your repository (the GitHub Actions workflows, the Pipelines configuration, a
.mise.toml, and a credential-less environment) and adds the tutorial unit. Pipelines runsplanautomatically and posts the result as a comment. Merge it and Pipelines runsapply. - Modify a unit. The second pull request changes an input value on the tutorial unit. Pipelines detects the change from the Git diff, plans it, and applies it on merge.
- Destroy a unit. The third pull request removes the tutorial unit. Pipelines runs
plan -destroyto show what will be removed, then destroys the resource on merge.
Because this wizard runs without cloud credentials, the tutorial unit uses local state and the environment it lands in has an empty authentication {} block. The real cloud authentication gets added in the next wizard.
Connect your cloud
Section titled “Connect your cloud”Right now, the only supported cloud provider for the onboarding wizard is AWS. Pipelines has support for Azure and GCP (and custom self-configured authentication for anything else), but the wizard only supports AWS at the time of writing.
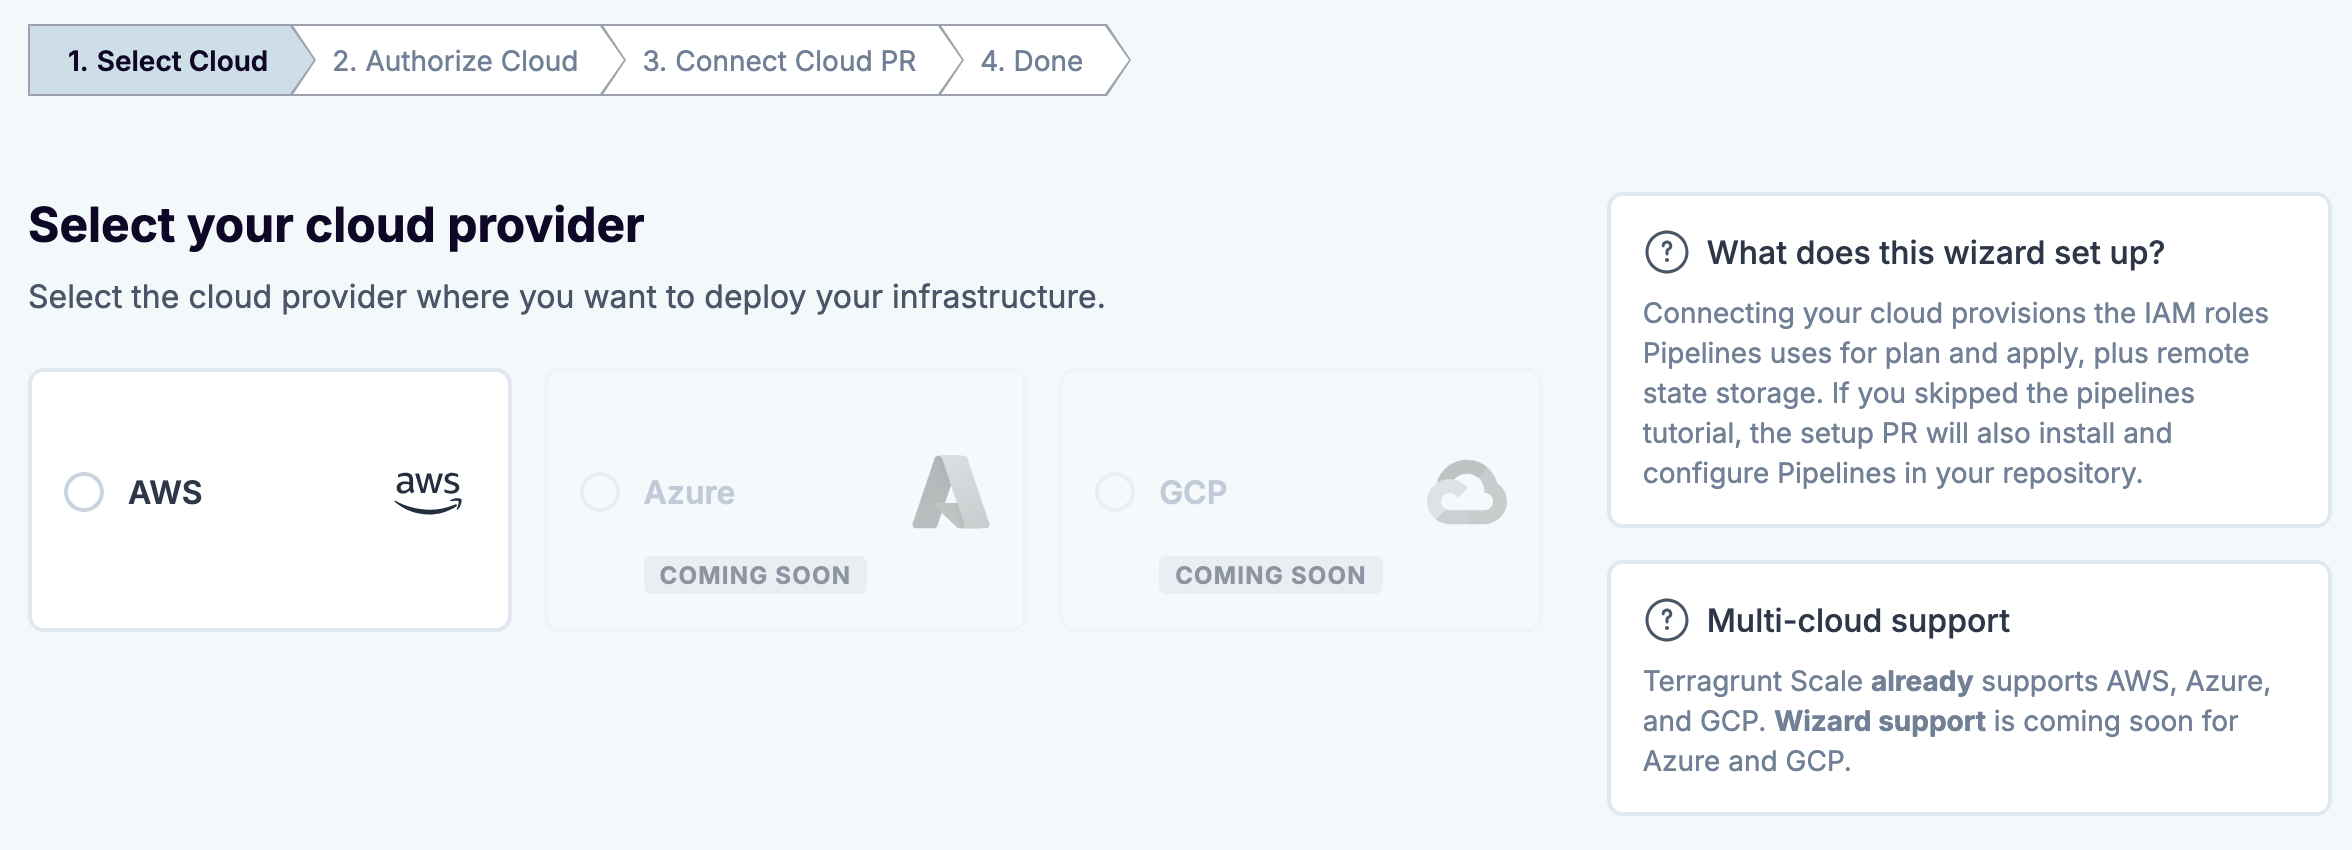
The wizard generates a script that you run in AWS CloudShell against the AWS account you want to use. This script provisions an OpenID Connect (OIDC) provider, the IAM roles that GitHub Actions will assume when running plans and applies, and an S3 bucket for your OpenTofu/Terraform state. If you’re unsure about running it, you can read the full source to learn what it does. You can even use the convenient “Analyze script with AI?” option to help you understand the different parts.
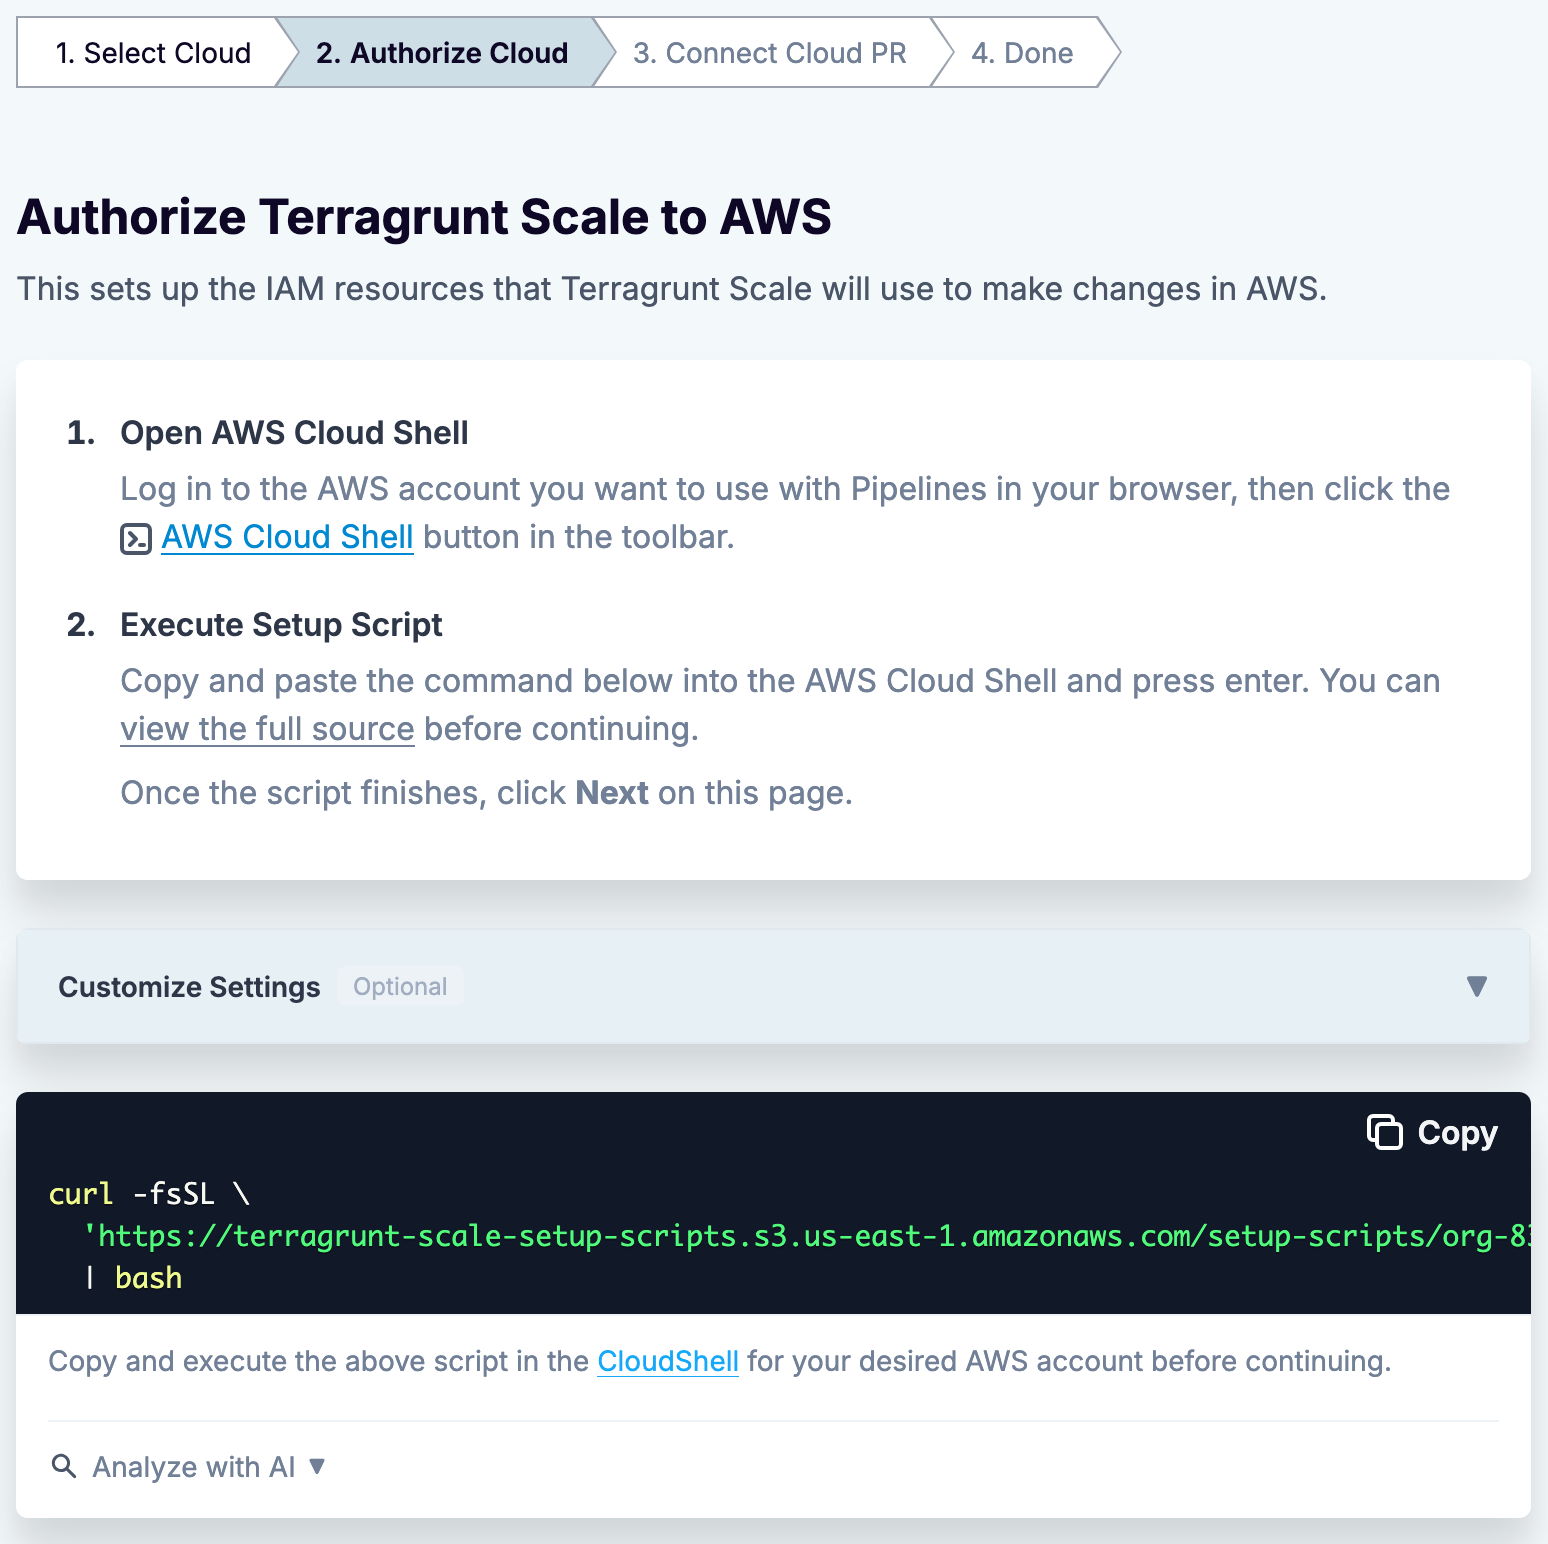
We’ll look at what OIDC does and why it matters later in this section.
Once the script finishes, the wizard detects completion and opens a pull request that imports those IAM resources into your infrastructure code and configures Pipelines to authenticate with them. This pull request adds the S3 backend configuration, the bootstrap stack, and a real environment with an aws_oidc block in place of the empty authentication {} from the previous wizard. You can optionally include a sample s3-bucket unit in this pull request to verify the connection by deploying a real resource.
Review and merge that pull request, and your repository is ready to deploy real infrastructure through Pipelines.
Understanding what onboarding set up
Section titled “Understanding what onboarding set up”Onboarding did a lot of work automatically across those three wizards. Before we start using the pipeline, it’s worth slowing down a second and exploring what’s been assembled.
Repository structure
Section titled “Repository structure”Clone the repository that onboarding configured and take a look at the directory tree.
Directory.github
Directoryworkflows
- pipelines-unlock.yml
- pipelines.yml
- .gitignore
Directory.gruntwork
- environment-account-name.hcl
- repository.hcl
- .mise.toml
Directoryaccount-name
Directory_global
Directorybootstrap
- terragrunt.stack.hcl
- region.hcl
- account.hcl
- README.md
- root.hcl
This is the end state after both pull requests merge. The “Run your first pipeline” wizard contributes the workflows, the Pipelines configuration, and .mise.toml. The “Connect your cloud” wizard contributes root.hcl, the account directory, the bootstrap stack, and the aws_oidc authentication.
If you’ve worked with Terragrunt before, this structure should look familiar. If you want to see the canonical version of this pattern, take a look at the terragrunt-infrastructure-live-stacks-example repository.
The key files:
.github/workflowscontains the GitHub Actions workflows that Terragrunt Scale configured..gruntworkcontains the configurations for Gruntwork products to understand how to properly interact with your environments (more on that later)..mise.tomldefines the versions pinned for Terragrunt and OpenTofu using mise.- Account directories (
account-name) organize infrastructure by AWS account. terragrunt.stack.hclfiles define stacks, which are collections of related units.root.hclcontains common configuration inherited by all units, including backend and provider settings.
The GitHub Actions workflows
Section titled “The GitHub Actions workflows”Open the .github/workflows/ directory. The main file you want to focus on is pipelines.yml.
The Pipelines workflow is triggered both when a PR is opened/updated and when it is merged. When the PR is opened/updated, Pipelines will run a Terragrunt plan on the source branch (e.g. tutorial/add-unit-1776108877709), and when it is merged, Pipelines will run a Terragrunt apply/destroy (for added/changed or removed units/stacks respectively) on the deploy branch (e.g. main). Pipelines will minimize the blast radius of these applies/destroys by ensuring that runs will only be performed in the units/stacks that are impacted by changes in the pull request. Pipelines also runs Terragrunt intelligently such that the Directed Acyclic Graph (DAG) is respected.
This is the plan-on-PR, apply-on-merge pattern described in the introduction. The main branch is always the source of truth for what’s deployed.
Gruntwork HCL configuration
Section titled “Gruntwork HCL configuration”Pipelines uses HCL to configure how it operates.
Onboarding installed two files in .gruntwork to configure Pipelines for you: repository.hcl and environment-account-name.hcl.
repository.hcl
Section titled “repository.hcl”// Gruntwork Pipelines repository-wide configuration.// Docs: https://docs.gruntwork.io/2.0/docs/pipelines/configuration/settings
repository { // Commits on this branch trigger `terragrunt apply`. // PRs against it trigger `terragrunt plan`. // If you change this, also update the branch trigger in your CI workflow file. deploy_branch_name = "main" env { PIPELINES_FEATURE_EXPERIMENT_IGNORE_UNITS_WITHOUT_ENVIRONMENT = "true" }}The repository block defines configurations that are global to the repository. These are configurations that should apply in all scenarios. The default configurations include:
- The
deploy_branch_name, which configures the branch that drives infrastructure deployment. Code updated in this branch results in apply/destroy runs. - The
env, which configures environment variables that are always set for Pipelines and Terragrunt. In the default bootstrap generated by Pipelines, the opt-inPIPELINES_FEATURE_EXPERIMENT_IGNORE_UNITS_WITHOUT_ENVIRONMENTfeature flag is set to ensure that any units without environments configured (more on that later) don’t result in runs.
environment-account-name.hcl
Section titled “environment-account-name.hcl”// Pipelines environment config for the account-name AWS account.// Pipelines reads all .hcl files in .gruntwork/.// Add a new file here to register a new environment.// Docs: https://docs.gruntwork.io/2.0/docs/pipelines/configuration/settings
environment "account-name" { // Defines the environment as matching all units under account-name/. filter { paths = ["account-name/*"] }
authentication { // Pipelines assumes these IAM roles via OIDC. No static credentials needed. // plan role: read-only, used on PRs. apply role: write, used on merge to deploy branch. // Both roles are created by the bootstrap stack in _global/bootstrap/. aws_oidc { account_id = "123456789012" plan_iam_role_arn = "arn:aws:iam::123456789012:role/pipelines-plan" apply_iam_role_arn = "arn:aws:iam::123456789012:role/pipelines-apply" } }}The environment block defines configurations for a particular set of units in your repository. You use the filter block to select those units by glob, and an authentication block to define how those units should be authenticated.
During the “Run your first pipeline” wizard, this authentication block was empty (authentication {}), which is why the tutorial unit planned and applied without any cloud credentials. When you connected your cloud, the wizard filled it in with the aws_oidc block above.
There are a couple different ways to authenticate in Pipelines. The one that’s been pre-configured here is the AWS OIDC authentication method. In this method, authentication takes place in an AWS account with the account ID account_id, and the plan_iam_role_arn IAM role is assumed on PR creation/update, whereas the apply_iam_role_arn IAM role is assumed on pushes to the deploy branch (e.g. main).
OIDC authentication
Section titled “OIDC authentication”When the bootstrap script ran, it created an OIDC provider and IAM roles in your AWS account. Here’s what’s happening when a CI job runs:
- GitHub Actions requests a short-lived token from GitHub’s OIDC provider.
- That token is exchanged with AWS STS for temporary credentials by assuming the IAM role that the bootstrap step created.
- The CI job uses those temporary credentials to run
terragrunt planorterragrunt apply/destroy. - The credentials expire after the job finishes.
At no point are long-lived AWS access keys stored in GitHub. There are no AWS_ACCESS_KEY_ID or AWS_SECRET_ACCESS_KEY values sitting in your repository secrets. Each CI run gets temporary credentials scoped to the permissions it needs (read-only on plan, and read-write on apply/destroy). If you want to learn more about how Terragrunt handles authentication in different contexts, read the Authentication documentation.
Note that the roles provisioned in your AWS account had trust policies that only allowed role assumption when particular claims were made on the JWT token sent from GitHub Actions to AWS.
The plan role trust policy
Section titled “The plan role trust policy”This is what the trust policy will look like for the plan role:
{ "Version": "2012-10-17", "Statement": [ { "Effect": "Allow", "Principal": { "Federated": "arn:aws:iam::123456789012:oidc-provider/token.actions.githubusercontent.com" }, "Action": "sts:AssumeRoleWithWebIdentity", "Condition": { "StringLike": { "token.actions.githubusercontent.com:sub": "repo:<your-org>/<your-repo>:*" } } } ]}Note that it will allow any branch on the <your-org>/<your-repo> repository to assume it. This is necessary, given that this role is going to be assumed when generating a plan during pull request open/update. It’s for this reason that the plan role is only given read-only permissions by default in the onboarding wizard. You want to ensure that IaC changes undergo review before they make any changes to live infrastructure.
The apply role trust policy
Section titled “The apply role trust policy”Note how this differs from the trust policy that is used in the apply role:
{ "Version": "2012-10-17", "Statement": [ { "Effect": "Allow", "Principal": { "Federated": "arn:aws:iam::123456789012:oidc-provider/token.actions.githubusercontent.com" }, "Action": "sts:AssumeRoleWithWebIdentity", "Condition": { "StringEquals": { "token.actions.githubusercontent.com:sub": "repo:<your-org>/<your-repo>:ref:refs/heads/main" } } } ]}The trust policy in this role only trusts the main branch of the <your-org>/<your-repo> repository. Branch protection on main becomes infrastructure protection: if a user can’t push to main or bypass required checks, they can’t apply changes to live infrastructure either.