Deploying an app
Onboarding already walked you through adding, modifying, and destroying a single unit. Now that we’ve explored what it produced, we can drive Pipelines directly from the repo without the Gruntwork developer portal, this time to deploy a real, multi-unit application.
We’re going to introduce a Terragrunt Stack, open a pull request, let the Pipelines workflow trigger a plan, then merge it to deploy our infrastructure update.
We’re going to be modeling the changes you’ll make here off the terragrunt-infrastructure-live-stacks-example repository. It’s a recommended starting template for how infrastructure can be modeled in a scalable fashion with stacks.
Cloning the repository
Section titled “Cloning the repository”Pipelines is a GitOps product, and all the changes that you’re going to drive happen from pull requests created and merged in the GitHub repository you created during Terragrunt Scale onboarding.
Clone your GitHub repository like so (assuming you use SSH for cloning):
git clone git@github.com:<your-org>/<your-repo>.gitOr like this if you clone your repos over HTTPS:
git clone https://github.com/<your-org>/<your-repo>.gitAdjusting Permissions
Section titled “Adjusting Permissions”Before we deploy any new infrastructure, we’ll want to adjust the permissions used by the IAM roles that were bootstrapped during onboarding. They don’t have the requisite permissions we’ll need to deploy the app, so we’ll have to make a pull request to change that first.
The default permissions created during bootstrapping are enough for most basic infrastructure updates, but they don’t include permissions to manage the my-special-app-db DynamoDB table we’re going to introduce in a bit. To address this, we’re going to copy the default policy that ships with the stack, and adjust it to include permissions for managing my-special-app-db.
These changes provide sufficient permissions, but they may be more or less permissive than you are comfortable with, or than your organization allows. Always carefully evaluate access control changes and determine if they are right for you and your organization.
Note that these permissions don’t just provide the permissions required for deploying your application, but also for managing the infrastructure that was bootstrapped during Terragrunt Scale onboarding. If you want to, you can set up Terragrunt Scale such that the IAM role used to manage your application doesn’t have permissions to manage the underlying infrastructure provisioned during bootstrapping. To support that, you can learn about the infrastructure-live-access-control pattern.
Defining the IAM policies
Section titled “Defining the IAM policies”To grant the plan and apply roles the requisite permissions to deploy the app, create the following plan_iam_policy.json and apply_iam_policy.json files in your account-name/_global/bootstrap stack directory.
{ "Version": "2012-10-17", "Statement": [ { "Sid": "S3StateBucketAccess", "Effect": "Allow", "Action": [ "s3:ListBucket", "s3:GetBucketVersioning", "s3:GetBucketAcl", "s3:GetBucketLogging", "s3:CreateBucket", "s3:PutBucketPublicAccessBlock", "s3:PutBucketTagging", "s3:PutBucketPolicy", "s3:PutBucketVersioning", "s3:PutEncryptionConfiguration", "s3:PutBucketAcl", "s3:PutBucketLogging", "s3:GetEncryptionConfiguration", "s3:GetBucketPolicy", "s3:GetBucketPublicAccessBlock", "s3:PutLifecycleConfiguration", "s3:PutBucketOwnershipControls" ], "Resource": "arn:aws:s3:::${state_bucket_name}" }, { "Sid": "S3StateBucketObjectAccess", "Effect": "Allow", "Action": [ "s3:PutObject", "s3:GetObject", "s3:DeleteObject" ], "Resource": "arn:aws:s3:::${state_bucket_name}/*" }, { "Sid": "DynamoDBLocksTableAccess", "Effect": "Allow", "Action": [ "dynamodb:DescribeTable", "dynamodb:GetItem", "dynamodb:PutItem", "dynamodb:DeleteItem" ], "Resource": "arn:${aws_partition}:dynamodb:*:*:table/terraform-locks" }, { "Sid": "DynamoDBReadAccess", "Effect": "Allow", "Action": [ "dynamodb:DescribeTable", "dynamodb:DescribeContinuousBackups", "dynamodb:DescribeTimeToLive", "dynamodb:ListTagsOfResource" ], "Resource": "arn:${aws_partition}:dynamodb:*:*:table/my-special-app-db" }, { "Sid": "LambdaReadAccess", "Effect": "Allow", "Action": [ "lambda:GetFunction", "lambda:GetFunctionConfiguration", "lambda:GetFunctionCodeSigningConfig", "lambda:GetFunctionUrlConfig", "lambda:GetPolicy", "lambda:ListVersionsByFunction", "lambda:ListTags" ], "Resource": "arn:${aws_partition}:lambda:*:*:function:my-special-app*" }, { "Sid": "IAMAppRoleReadAccess", "Effect": "Allow", "Action": [ "iam:GetRole", "iam:GetRolePolicy", "iam:ListRolePolicies", "iam:ListAttachedRolePolicies", "iam:ListInstanceProfilesForRole", "iam:ListRoleTags" ], "Resource": "arn:${aws_partition}:iam::*:role/my-special-app*" }, { "Sid": "IAMPipelinesRoleReadAccess", "Effect": "Allow", "Action": [ "iam:GetRole", "iam:ListRolePolicies", "iam:ListAttachedRolePolicies", "iam:ListInstanceProfilesForRole", "iam:ListRoleTags" ], "Resource": [ "arn:${aws_partition}:iam::*:role/pipelines-plan", "arn:${aws_partition}:iam::*:role/pipelines-apply" ] }, { "Sid": "IAMPipelinesPolicyReadAccess", "Effect": "Allow", "Action": [ "iam:GetPolicy", "iam:GetPolicyVersion", "iam:ListPolicyVersions" ], "Resource": [ "arn:${aws_partition}:iam::*:policy/pipelines-plan", "arn:${aws_partition}:iam::*:policy/pipelines-apply" ] }, { "Sid": "OIDCProviderReadAccess", "Effect": "Allow", "Action": [ "iam:GetOpenIDConnectProvider" ], "Resource": "arn:${aws_partition}:iam::*:oidc-provider/token.actions.githubusercontent.com" } ]}{ "Version": "2012-10-17", "Statement": [ { "Sid": "S3StateBucketAccess", "Effect": "Allow", "Action": [ "s3:ListBucket", "s3:GetBucketVersioning", "s3:GetBucketAcl", "s3:GetBucketLogging", "s3:CreateBucket", "s3:PutBucketPublicAccessBlock", "s3:PutBucketTagging", "s3:PutBucketPolicy", "s3:PutBucketVersioning", "s3:PutEncryptionConfiguration", "s3:PutBucketAcl", "s3:PutBucketLogging", "s3:GetEncryptionConfiguration", "s3:GetBucketPolicy", "s3:GetBucketPublicAccessBlock", "s3:PutLifecycleConfiguration", "s3:PutBucketOwnershipControls" ], "Resource": "arn:aws:s3:::${state_bucket_name}" }, { "Sid": "S3StateBucketObjectAccess", "Effect": "Allow", "Action": [ "s3:PutObject", "s3:GetObject", "s3:DeleteObject" ], "Resource": "arn:aws:s3:::${state_bucket_name}/*" }, { "Sid": "DynamoDBLocksTableAccess", "Effect": "Allow", "Action": [ "dynamodb:DescribeTable", "dynamodb:GetItem", "dynamodb:PutItem", "dynamodb:DeleteItem" ], "Resource": "arn:${aws_partition}:dynamodb:*:*:table/terraform-locks" }, { "Sid": "DynamoDBFullAccess", "Effect": "Allow", "Action": [ "dynamodb:CreateTable", "dynamodb:DeleteTable", "dynamodb:UpdateTable", "dynamodb:DescribeTable", "dynamodb:DescribeContinuousBackups", "dynamodb:DescribeTimeToLive", "dynamodb:UpdateTimeToLive", "dynamodb:UpdateContinuousBackups", "dynamodb:TagResource", "dynamodb:UntagResource", "dynamodb:ListTagsOfResource" ], "Resource": "arn:${aws_partition}:dynamodb:*:*:table/my-special-app-db" }, { "Sid": "LambdaFullAccess", "Effect": "Allow", "Action": [ "lambda:CreateFunction", "lambda:DeleteFunction", "lambda:UpdateFunctionCode", "lambda:UpdateFunctionConfiguration", "lambda:GetFunction", "lambda:GetFunctionConfiguration", "lambda:GetFunctionCodeSigningConfig", "lambda:GetFunctionUrlConfig", "lambda:CreateFunctionUrlConfig", "lambda:UpdateFunctionUrlConfig", "lambda:DeleteFunctionUrlConfig", "lambda:GetPolicy", "lambda:AddPermission", "lambda:RemovePermission", "lambda:ListVersionsByFunction", "lambda:ListTags", "lambda:TagResource", "lambda:UntagResource", "lambda:PublishVersion" ], "Resource": "arn:${aws_partition}:lambda:*:*:function:my-special-app*" }, { "Sid": "IAMAppRoleFullAccess", "Effect": "Allow", "Action": [ "iam:CreateRole", "iam:DeleteRole", "iam:UpdateRole", "iam:GetRole", "iam:GetRolePolicy", "iam:PutRolePolicy", "iam:DeleteRolePolicy", "iam:ListRolePolicies", "iam:ListAttachedRolePolicies", "iam:ListInstanceProfilesForRole", "iam:ListRoleTags", "iam:TagRole", "iam:UntagRole", "iam:PassRole", "iam:AttachRolePolicy", "iam:DetachRolePolicy" ], "Resource": "arn:${aws_partition}:iam::*:role/my-special-app*" }, { "Sid": "IAMPipelinesRoleFullAccess", "Effect": "Allow", "Action": [ "iam:CreateRole", "iam:DeleteRole", "iam:UpdateRole", "iam:UpdateAssumeRolePolicy", "iam:GetRole", "iam:ListRolePolicies", "iam:ListAttachedRolePolicies", "iam:ListInstanceProfilesForRole", "iam:ListRoleTags", "iam:TagRole", "iam:UntagRole", "iam:AttachRolePolicy", "iam:DetachRolePolicy" ], "Resource": [ "arn:${aws_partition}:iam::*:role/pipelines-plan", "arn:${aws_partition}:iam::*:role/pipelines-apply" ] }, { "Sid": "IAMPipelinesPolicyFullAccess", "Effect": "Allow", "Action": [ "iam:CreatePolicy", "iam:DeletePolicy", "iam:GetPolicy", "iam:GetPolicyVersion", "iam:CreatePolicyVersion", "iam:DeletePolicyVersion", "iam:ListPolicyVersions", "iam:TagPolicy", "iam:UntagPolicy" ], "Resource": [ "arn:${aws_partition}:iam::*:policy/pipelines-plan", "arn:${aws_partition}:iam::*:policy/pipelines-apply" ] }, { "Sid": "OIDCProviderFullAccess", "Effect": "Allow", "Action": [ "iam:CreateOpenIDConnectProvider", "iam:DeleteOpenIDConnectProvider", "iam:UpdateOpenIDConnectProviderThumbprint", "iam:GetOpenIDConnectProvider", "iam:AddClientIDToOpenIDConnectProvider", "iam:RemoveClientIDFromOpenIDConnectProvider", "iam:TagOpenIDConnectProvider", "iam:UntagOpenIDConnectProvider" ], "Resource": "arn:${aws_partition}:iam::*:oidc-provider/token.actions.githubusercontent.com" } ]}Wiring policies into the bootstrap stack
Section titled “Wiring policies into the bootstrap stack”Now that those two files are in place, we can adjust the account-name/_global/bootstrap/terragrunt.stack.hcl file so that it references them. The highlighted lines below are the new ones that wire the policy templates into the bootstrap stack.
// Bootstrap stack: provisions the GitHub OIDC provider and plan/apply IAM roles in this environment.// Terragrunt Stacks: https://docs.terragrunt.com/features/stacks/
locals {  // Read from parent configurations instead of defining these values locally  // so that other stacks and units in this directory can reuse the same configurations.  account_hcl = read_terragrunt_config(find_in_parent_folders("account.hcl"))}
stack "bootstrap" {  // To upgrade: update the ?ref= tag and review https://github.com/gruntwork-io/terragrunt-scale-catalog/releases  source = "github.com/gruntwork-io/terragrunt-scale-catalog//stacks/aws/github/pipelines-bootstrap?ref=v1.10.1"  path   = "bootstrap"
  values = {    // Should match the ?ref= above.    terragrunt_scale_catalog_ref = "v1.10.1"
    aws_account_id = "123456789012"
    // Prefix for the IAM roles created: <prefix>-plan and <prefix>-apply.    oidc_resource_prefix = "pipelines"
    // Only Actions workflows in this org/repo can assume the IAM roles.    github_org_name  = "john-doe"    github_repo_name = "acme-infrastructure-live"    deploy_branch    = "main"
    state_bucket_name = local.account_hcl.locals.state_bucket_name
    plan_iam_policy = templatefile("${get_terragrunt_dir()}/plan_iam_policy.json", {      state_bucket_name = local.account_hcl.locals.state_bucket_name      aws_partition     = "aws"    })
    apply_iam_policy = templatefile("${get_terragrunt_dir()}/apply_iam_policy.json", {      state_bucket_name = local.account_hcl.locals.state_bucket_name      aws_partition     = "aws"    })
    // =========================================================================    // Import Variables    //    // The following variables are used to import existing AWS resources into    // OpenTofu/Terraform state. Once the stack has been applied and resources    // have been successfully imported, it is safe to remove this entire section.    // =========================================================================    oidc_provider_import_arn                    = "arn:aws:iam::123456789012:oidc-provider/token.actions.githubusercontent.com"    plan_iam_role_import_existing               = true    plan_iam_policy_import_arn                  = "arn:aws:iam::123456789012:policy/pipelines-plan"    plan_iam_role_policy_attachment_import_arn  = "pipelines-plan/arn:aws:iam::123456789012:policy/pipelines-plan"    apply_iam_role_import_existing              = true    apply_iam_policy_import_arn                 = "arn:aws:iam::123456789012:policy/pipelines-apply"    apply_iam_role_policy_attachment_import_arn = "pipelines-apply/arn:aws:iam::123456789012:policy/pipelines-apply"    // =========================================================================    // End Import Variables    // =========================================================================  }}
This is how the JSON definition of the permissions used for the plan/apply roles get plumbed down to the relevant plan/apply units.
Submitting the permissions PR
Section titled “Submitting the permissions PR”Commit the changes here in a new branch, and push them to your remote repository.
git checkout -b chore/adjusting-permissions-for-rolesgit add .git commit -m "chore: Adjusting permissions for roles"git push -u origin chore/adjusting-permissions-for-rolesYou can click the link you get from GitHub in stdout (or use the gh CLI if you have it installed) to create the pull request.
gh pr create --title 'chore: Adjusting permissions for roles' --body 'Adjusting the permissions for the roles provisioned during Terragrunt Scale baseline.'If you use the gh CLI for this, you can also run the following to load the pull request in your browser.
gh pr view -wYou should see a pull request with a comment like the following on GitHub.
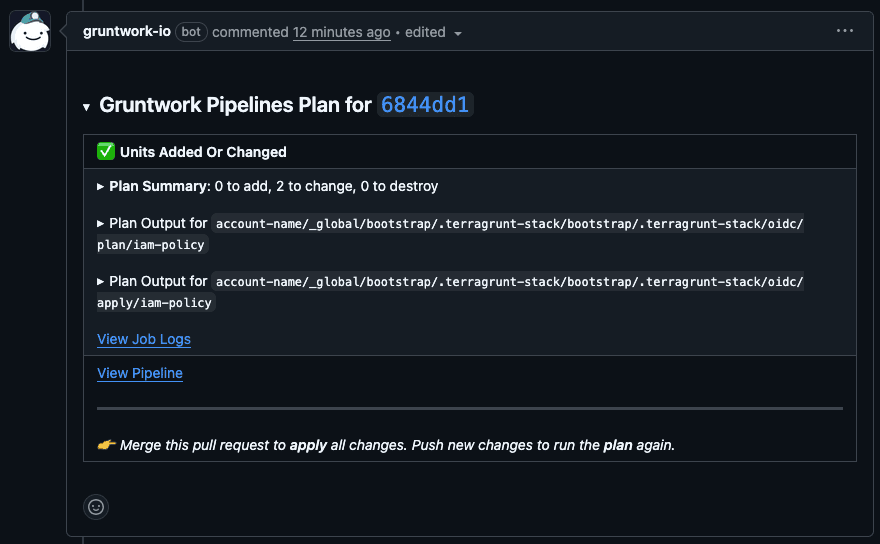
Clicking on those “Plan Summary” and “Plan Output” summaries will disclose more details on the plan of your pull request. Take a look at the changes this pull request is going to result in, then merge the pull request. After a bit, you’ll see another comment like the following displaying the permissions updates.

This is the general flow that you’ll go through whenever you interact with Terragrunt Scale products. They’re all designed around GitOps principles, and the code is the source of truth for your infrastructure. To change your infrastructure, change the code and open a pull request.
Deploying the app
Section titled “Deploying the app”Now that we have the requisite permissions to deploy our app, let’s go ahead and deploy it.
Adding the application stack
Section titled “Adding the application stack”Switch back to main, check out a new branch, and add a new stack adapted from the infrastructure-live-stacks-example repository.
First, run the following in your local repository to prepare your local branch for the new content:
git checkout maingit pullgit checkout -b feat/adding-my-special-appNext, you can add the following terragrunt.stack.hcl file to a new directory in account-name/us-east-1/app:
locals {  name = "my-special-app"
  version = "v1.1.1"}
unit "lambda_service" {  source = "github.com/gruntwork-io/terragrunt-infrastructure-catalog-example//units/js-lambda-stateful-service?ref=${local.version}"
  path = "service"
  values = {    version = local.version
    name = local.name
    // Required inputs    runtime    = "nodejs22.x"    source_dir = "./src"    handler    = "index.handler"    zip_file   = "handler.zip"
    // Optional inputs    memory  = 128    timeout = 3
    // Dependency paths    role_path           = "../roles/lambda-iam-role-to-dynamodb"    dynamodb_table_path = "../db"  }}
unit "db" {  source = "github.com/gruntwork-io/terragrunt-infrastructure-catalog-example//units/dynamodb-table?ref=${local.version}"
  path = "db"
  values = {    version = local.version
    name          = "${local.name}-db"    hash_key      = "Id"    hash_key_type = "S"  }}
unit "role" {  source = "github.com/gruntwork-io/terragrunt-infrastructure-catalog-example//units/lambda-iam-role-to-dynamodb?ref=${local.version}"
  path = "roles/lambda-iam-role-to-dynamodb"
  values = {    version = local.version
    name = "${local.name}-role"
    dynamodb_table_path = "../../db"  }}
Submitting the deployment PR
Section titled “Submitting the deployment PR”Now you can commit this file, push your branch up, and create a pull request to deploy your infrastructure in the same way you adjusted the permissions for the IAM roles earlier.
git add .git commit -m "feat: Adding my special app"git push -u origin feat/adding-my-special-appAnd again, you can either click the link that GitHub gives you, or you can use the gh CLI to create the merge request.
gh pr create --title 'feat: Adding my special app' --body 'Adding my special app.'Just like before, you’ll get a plan with the changes that you’re about to deploy that you can review.
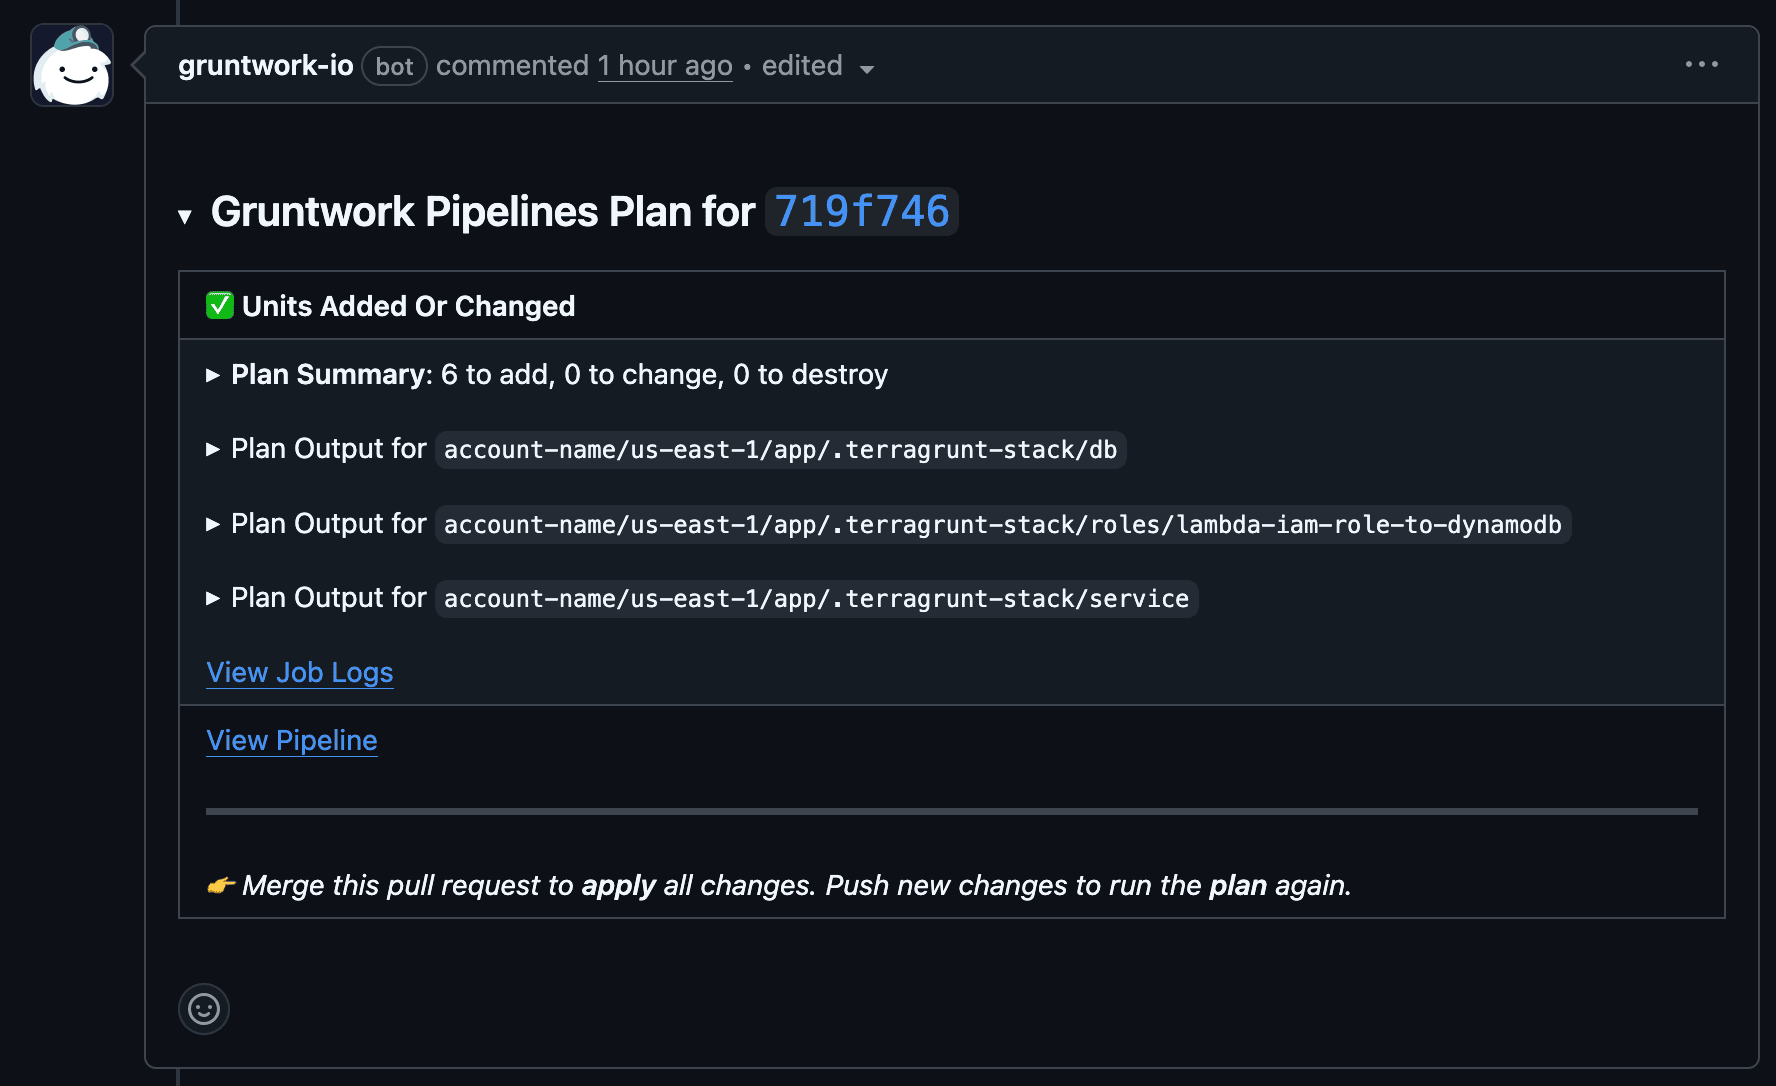
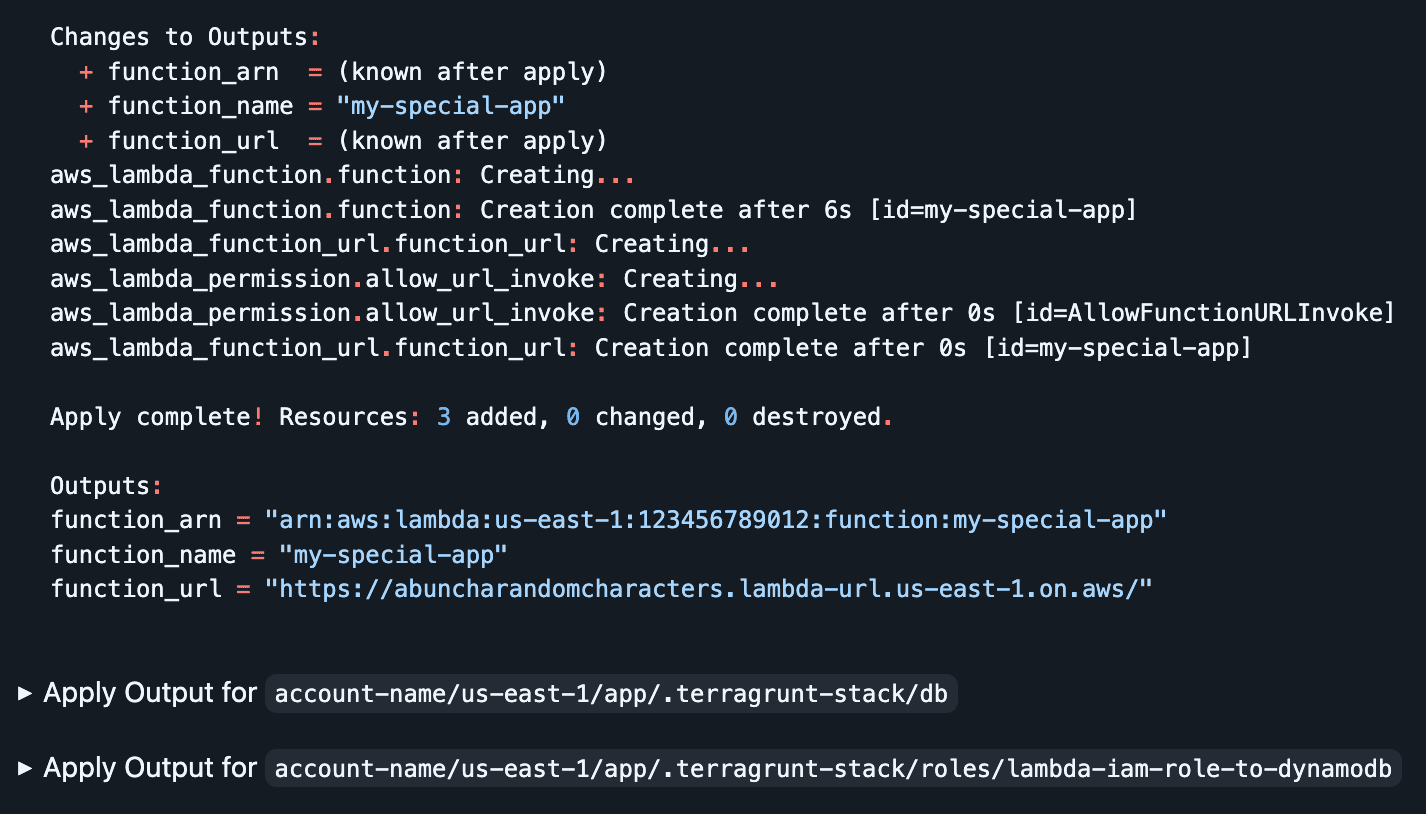
Once you merge, you’ll get the comment with the apply update.
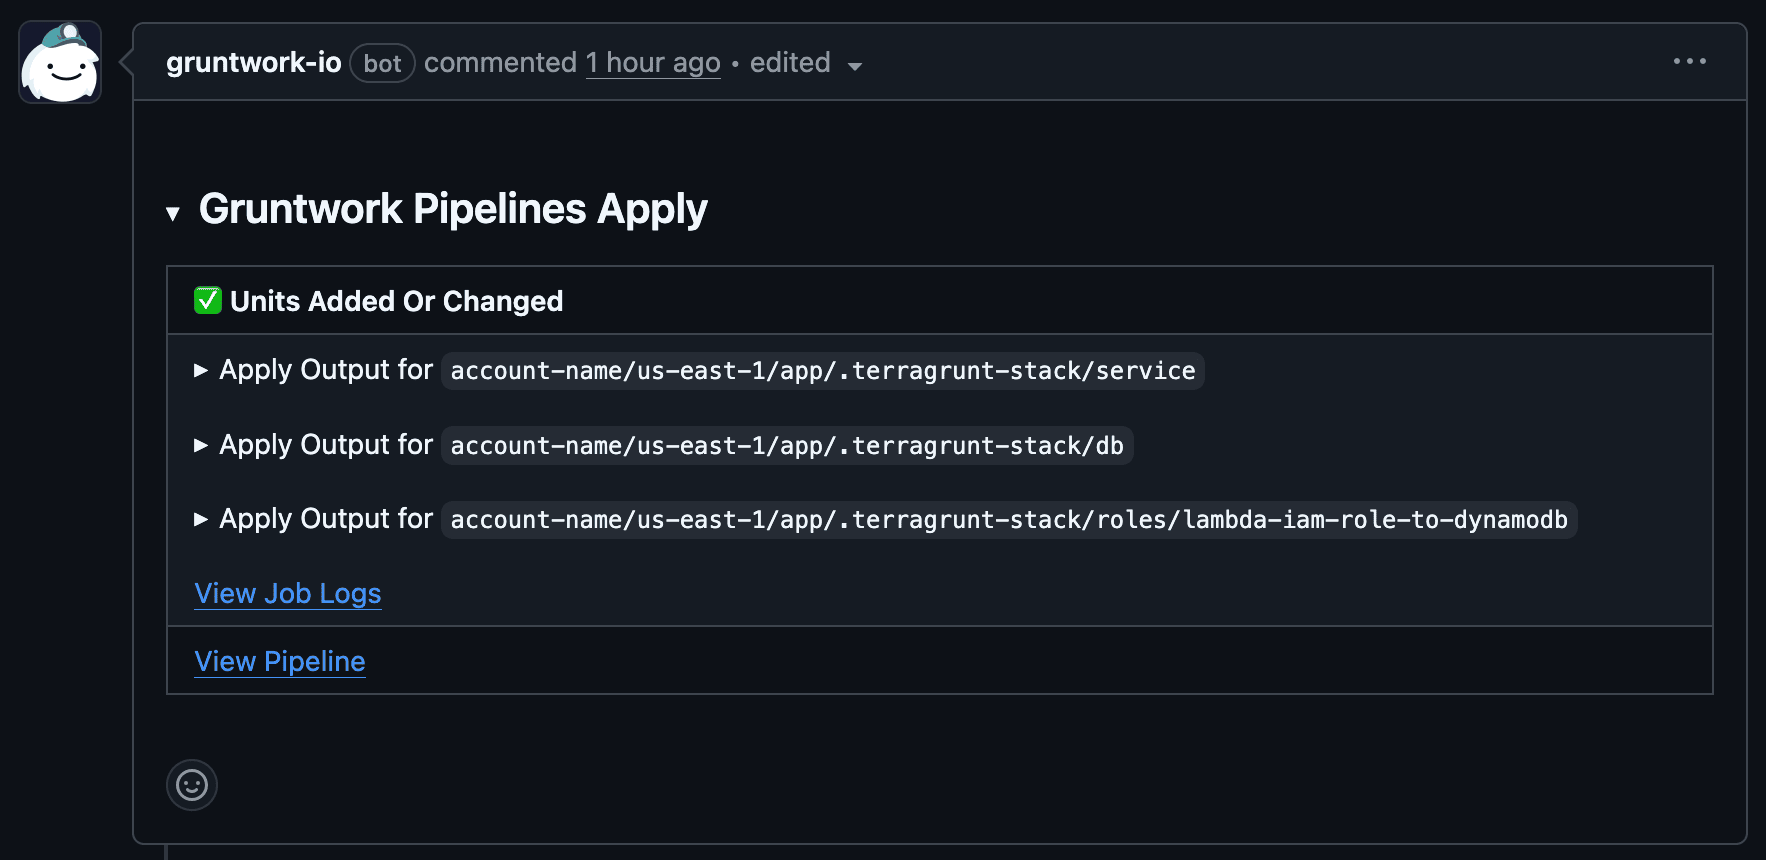
If you click “Apply Output for account-name/us-east-1/app/.terragrunt-stack/service”, you’ll get the full apply output, including the URL for the service you just deployed!
Testing the app
Section titled “Testing the app”If you navigate to that link, or use curl locally, you’ll be able to see a simple JSON object indicating the number of times the service has received a POST request.
$ curl -s 'https://abuncharandomcharacters.lambda-url.us-east-1.on.aws/'{"count":0}You can also send some POST requests to see the value increment up to prove to yourself that it’s properly integrated with the database.
$ curl -s -XPOST 'https://abuncharandomcharacters.lambda-url.us-east-1.on.aws/'{"count":1}$ curl -s -XPOST 'https://abuncharandomcharacters.lambda-url.us-east-1.on.aws/'{"count":2}$ curl -s -XPOST 'https://abuncharandomcharacters.lambda-url.us-east-1.on.aws/'{"count":3}$ curl -s 'https://abuncharandomcharacters.lambda-url.us-east-1.on.aws/'{"count":3}Clean-up
Section titled “Clean-up”Cleanup is simple with GitOps: revert the pull request in the GitHub UI.

Pipelines is pretty smart, and it’s able to work out that removing this content in a pull request signals that it needs to run Terragrunt to destroy those resources. You’ll get a plan that shows those units in the stack getting plan -destroy called on them, and when you merge, you’ll be done with your clean-up!
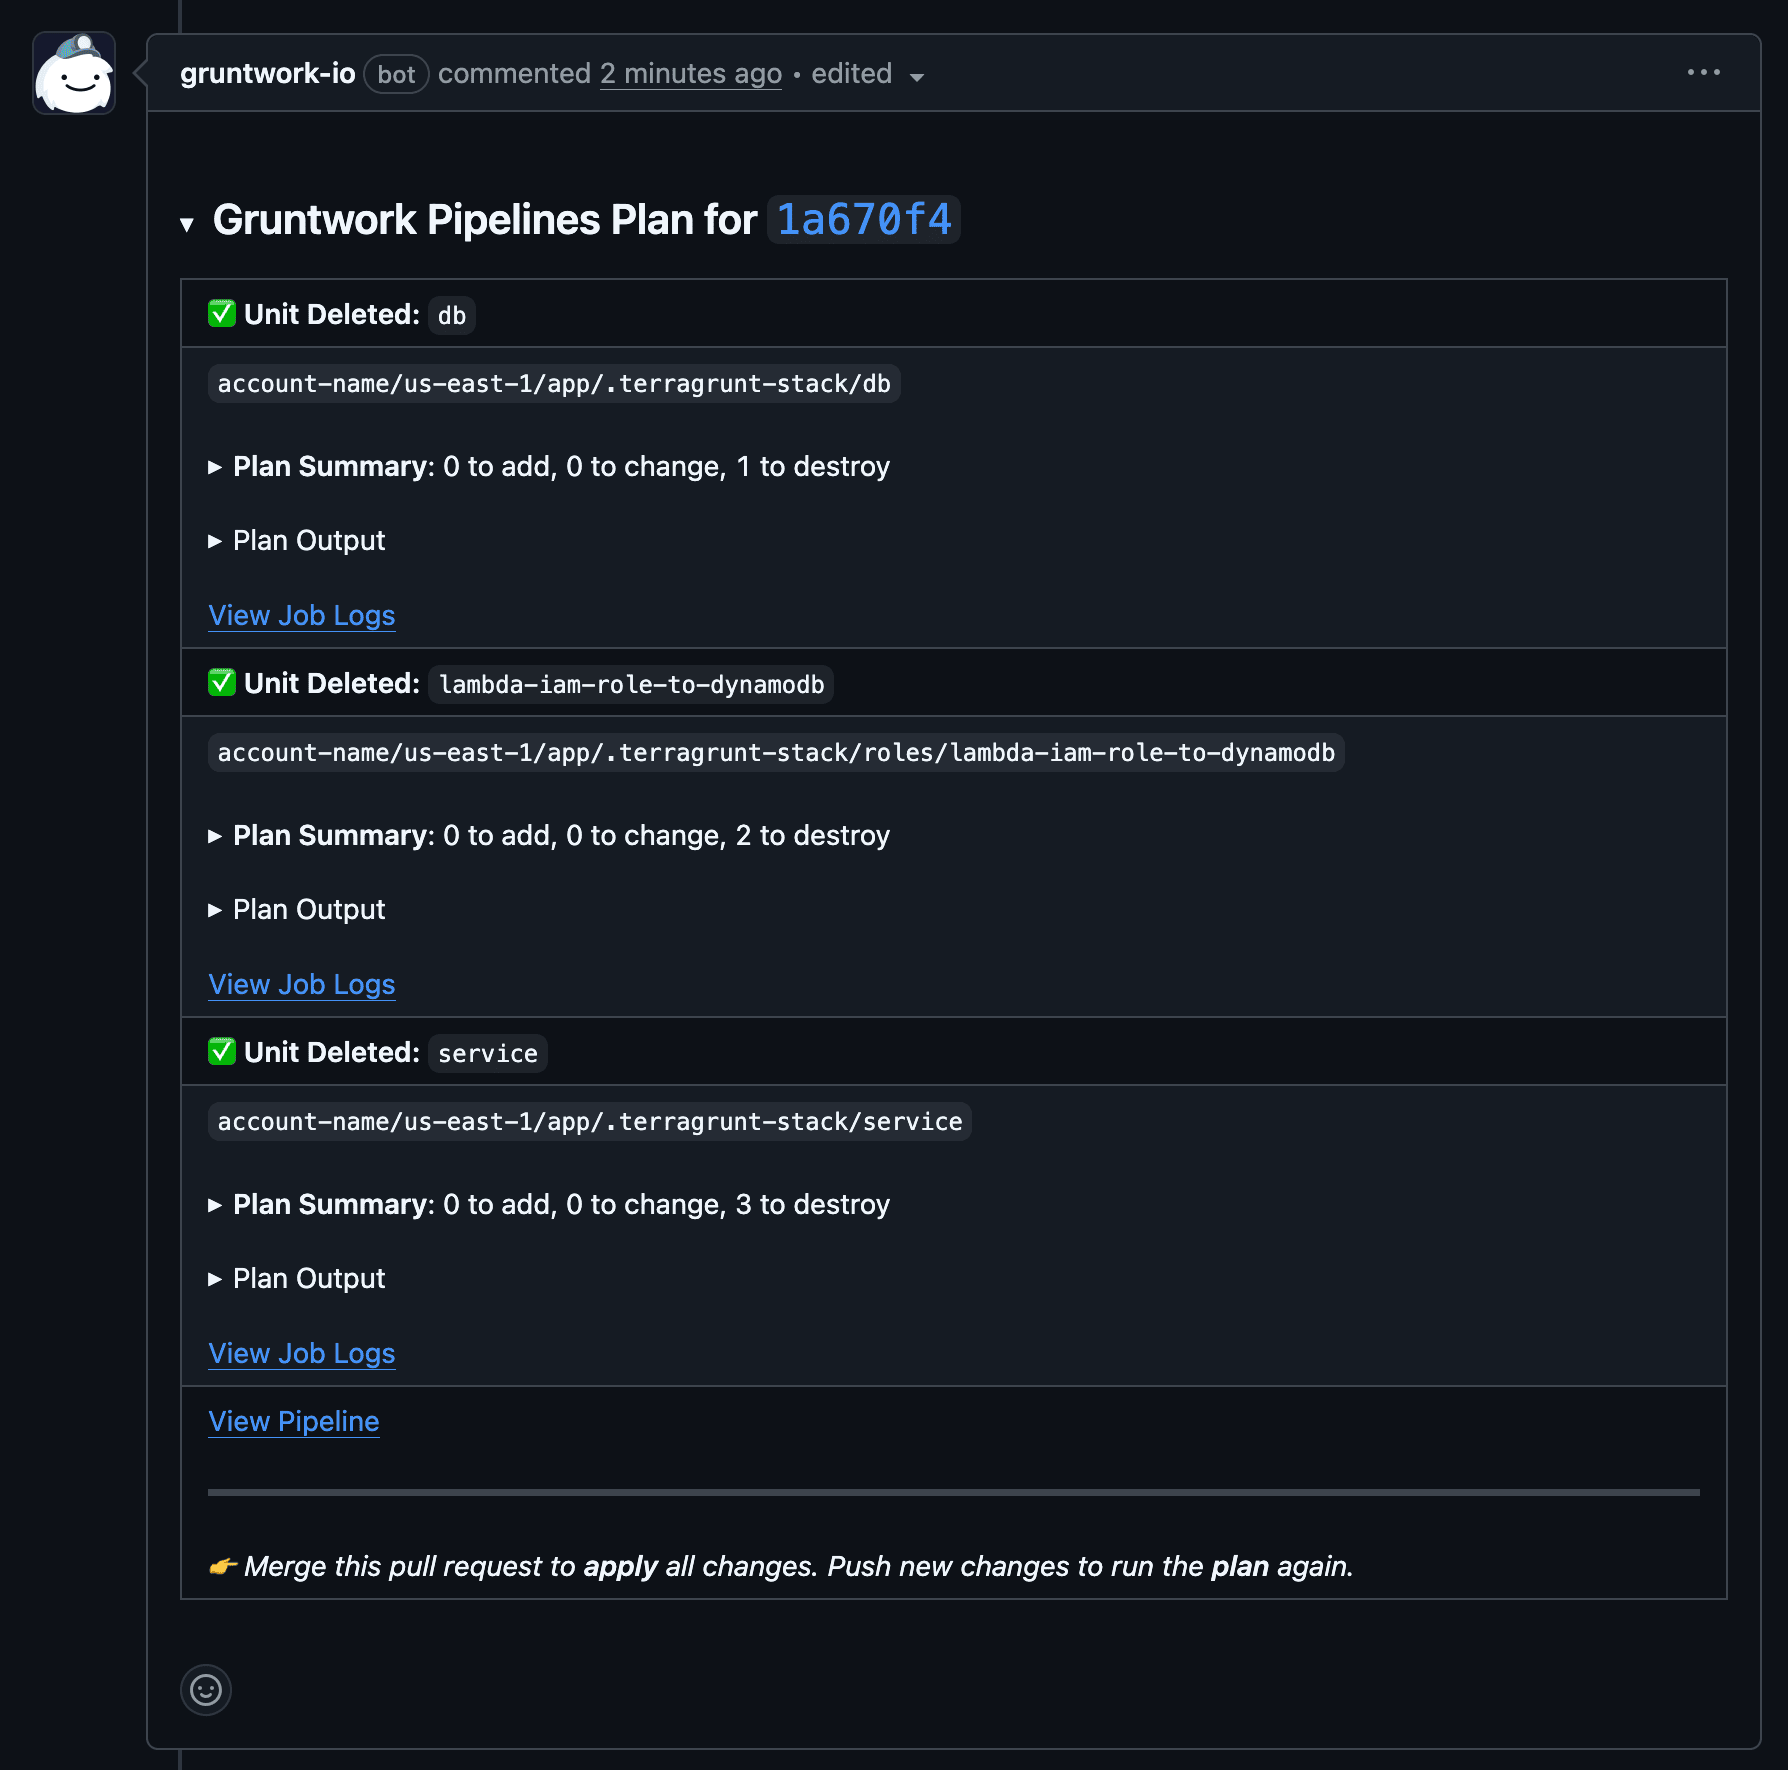
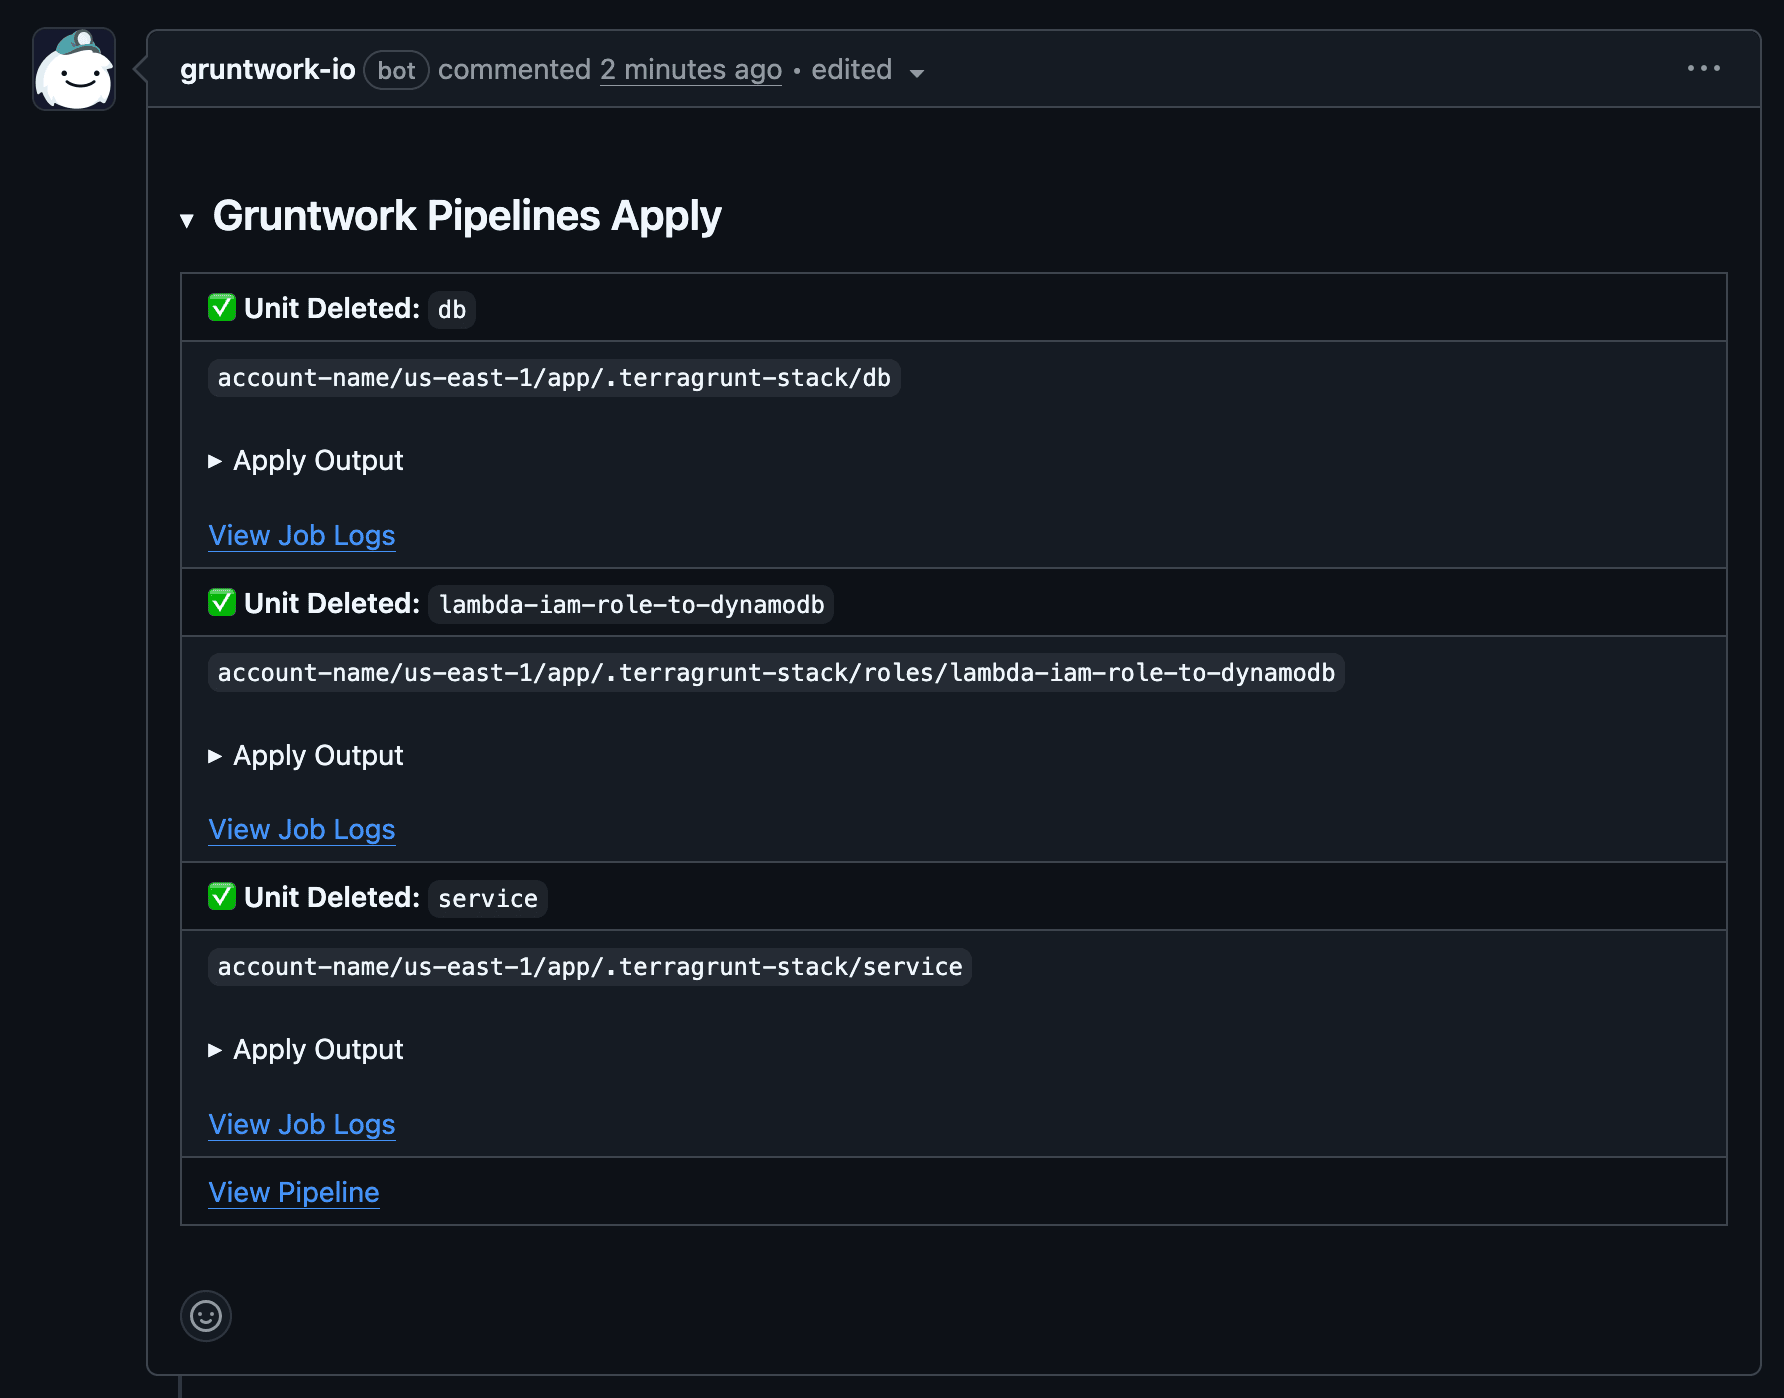
Note that the plan lists the units as being deleted, with a count of the resources being destroyed in each unit.
Once you merge the pull request, you’ll get a comment like the following: